What is a Chrome extension?
An exploration into Chrome extensions. A project to skip the backstory of recipe websites and jump right to the ingredients or directions.

I created a Chrome extension that skips the author's biography at the beginning of most of these recipe sites and takes you directly to either the ingredients or directions.
My goal for this project was to experiment a little with Chrome's APIs. Specifically, I wanted to do a little investigation into the storage and scripting APIs. How are user settings saved? How is the HTML and JS getting injected?
I didn't have any intention of a very stylish extension, I used some very basic HTML and CSS for styling. I have cited Angela Velasquez in the CSS for the code that I have borrowed to make a more stylish radio button.
You can see her code on codepen.
Manifest
A Chrome extension manifest basically tells Chrome what pages to run your extension, what permissions it will need and use, and other basic information like where to find your name, description, author, version, icons, and most importantly where to find your scripts and HTML files.
Currently, Chrome is using Manifest Version 3(MV3) which is less than a year old and, for the purpose of my project, has a few small changes from MV2.
A manifest is a .json file that will contain all the information about your extension. My manifest looks like this:
{
    "name": "Easy Ingredients",
    "description": "Get the ingredients from a recipe page",
    "version": "0.1.0",
    "manifest_version": 3,
    "background": {
        "service_worker": "background.js"
    },
    "action": {
        "default_popup":  "./src/html/popup.html"
    },
    "options_page": "./src/html/options.html",
    "permissions": [
        "activeTab",
        "tabs",
        "storage",
        "scripting"
    ],
    "host_permissions": [
        "<all_urls>"
    ],
    "icons": {
        "16": "./img/lemon-icon-16.png",
        "48": "./img/lemon-icon-48.png",
        "128": "./img/lemon-icon-48.png"
    }
}
Web Scraping
After inspecting a few recipe site's HTML I noticed that, usually, the ingredients section on the page had <div>s with class names named 'ingredients'. I decided it would be easy enough to scrape through each page's HTML to find these class names and if found, I could inject my script.
I had a few problems later on in the project due to recipe sites using search bars or sidebars containing class names with 'ingredients' in them. This messed with my function scrolling correctly to right part of the page.
Background Script
A background script is the part of the extension that listens for triggers while you interact with the browser. A trigger could include opening a new tab, load a new site, or receive a message from another script.
Events are browser triggers, such as navigating to a new page, removing a bookmark, or closing a tab. Extensions monitor these events in their background script, then react with specified instructions.
First, in my background script I make a call to get the user settings saved in Chrome's storage. If it's the first time use or the results can't be found I set the user_data object to the default settings.
The user_data object is cached as a global variable. Chrome has a cache API that can be used but I figured I only had two values to save so it wouldn't impact performance all that much.
//updates the user_data object (on startup and changes made on options page)
//if no result is found  set default settings. (first install)
const updateUserData = () => {
    chrome.storage.sync.get(['btn_disp', 'light_mode'], (result) => {
        if(!result){
            user_data = {
                btn_disp = true,
                light_mode = true
            }
        } else {
            user_data = result;
        }
    });
}

updateUserData();
Next, I set up a listener to listen for one of those triggers I spoke about earlier. When the current tab the user is viewing loads a new website my content script and CSS gets injected.
For simplicity, I have the listener inject the content script and CSS into every new site that is loaded. I am sure that I could make it a little more functional to load on more appropriate sites only but I didn't end up implementing this.
//inject the script into page
//only inject on complete load
chrome.tabs.onUpdated.addListener((tabId, changeInfo, tab) => {

    //listening for the 'complete' message from tabs
    if(changeInfo.status === 'complete'){
        chrome.scripting.executeScript({
            target: { tabId: tabId },
            files: ['./src/js/content.js']
        })
            .then(() => {
                console.log('INJECTED');
            })
            .catch(err => console.log(err));

        chrome.scripting.insertCSS({
            target: {tabId: tabId},
            files: ['./src/css/page_btn_styles.css']
        })
            .then(() => {
                sendToForeground();
            })
            .catch(err => console.log(err));
    }
});
The sendToForeground() function sends a page_loaded message to the content script. The idea of this function was to make the message customizable but this project only really had one message that it ever needed to send to the content script so I left the message hard coded.
//page loaded message sends
//foreground script has been injected and loads buttons if needed
function sendToForeground() {
    chrome.tabs.query({ active: true, currentWindow: true }, function(tabs) {
        chrome.tabs.sendMessage(tabs[0].id, {
            message: 'page_loaded',
            data: user_data
        });
    });
}
The last listener in my background script listens for changes to the storage API. When the user changes one of the settings from the option page the cached user_data gets updated.
//update cached user_data object when changes are made
//changes can only occur from the options page
chrome.storage.onChanged.addListener((changes, namespace) => {
    updateUserData();
});
Content Script
Content scripts are files that run in the context of web pages. By using the standard Document Object Model (DOM), they are able to read details of the web pages the browser visits, make changes to them, and pass information to their parent extension.
A content script can't directly interact with Chrome's APIs and this is where message passing comes in. This is the reason for the background script sending the 'page_loaded' message.
I set up a listener in the content script listening for the 'page_loaded' message. Once it receives this message it knows to check for any class names that include the word 'ingredient'. If found, it makes a call to the loadPageBtns(request.data) function. request.data is the user_data object that was sent from the background script.
//message from background.js that page has loaded
//if ingreidents classname found loadPageBtns called
chrome.runtime.onMessage.addListener((request, sender, sendResponse) => {
    if(request.message === 'page_loaded'){
        const allElements = document.querySelectorAll('*');

        for(let i = 0; i < allElements.length; i++) {
            if(allElements[i].className.toString().match(/ingredient/g)){
                loadPageBtns(request.data);
                break;
            }
        }
    }
});

//loads the buttons for the website if user_data.show_btns = true
function loadPageBtns(user_data) {
    if(user_data.btn_disp){
        //container for buttons on page
        let container = document.createElement('div');
        container.id = 'btns-container';

        //ingredients button
        let ingredientsBtn = document.createElement('button');
        ingredientsBtn.id = 'ingredients-btn';
        ingredientsBtn.classList.add('page-btns');
        ingredientsBtn.classList.add('animated');
        ingredientsBtn.classList.add('bounceInLeft');
        ingredientsBtn.innerText = 'Get Ingredients';
        ingredientsBtn.addEventListener('click', () => {
            scrollToIngredients();
        });
        ingredientsBtn.addEventListener('mouseover', () => {
            ingredientsBtn.classList.remove('animated');
        });


        //load event handler for click on recipe
        //recipe button
        let recipesBtn = document.createElement('button');
        recipesBtn.id = 'recipes-btn';
        recipesBtn.classList.add('page-btns');
        recipesBtn.classList.add('animated');
        recipesBtn.classList.add('bounceInLeft');
        recipesBtn.innerText = 'Get Recipe';
        recipesBtn.addEventListener('click', () => {
            scrollToDirections();
        });
        recipesBtn.addEventListener('mouseover', () => {
            recipesBtn.classList.remove('animated');
        });

        container.appendChild(ingredientsBtn);
        container.appendChild(recipesBtn);

        document.body.appendChild(container);
    }
}
The two buttons have event listeners that are waiting for a click. Using some JS I managed to use the scrollIntoView() methods to move the view port to section of the page containing either the recipe or ingredients.
//find the ingredients classname and scroll section into view
function scrollToIngredients(){
    const allElements = document.querySelectorAll('*');

    for(let i = 0; i < allElements.length; i++){
        //search for classnames that include 'ingredients'
        if (allElements[i].className.toString().match(/ingredient/g)){
             //check to see if it contains 'sidebar' --> add 'search'
            if (allElements[i].className.toString().match(/sidebar|search/g)){
                continue;
            }else{
                let classArr = allElements[i].className.toString().split(' ');
                let ingredURL = document.getElementsByClassName(classArr[0]);

                ingredURL.item(0).scrollIntoView({
                    behavior: 'smooth',
                    block: 'start',
                    inline: 'nearest'
                });
                break;
            }
        }
    }
}

//find the direction/instruction classname and scroll section into view
function scrollToDirections() {
    //Get all html from page
    const allElements = document.querySelectorAll('*');

    for(let i = 0; i < allElements.length; i++){
        if(allElements[i].className.toString().match(/direction|instruction/g)){
            let classArr = allElements[i].className.toString().split(' ');
            let directionURL = document.getElementsByClassName(classArr[0]);

            directionURL.item(0).scrollIntoView({
                behavior: 'smooth',
                block: 'start',
                inline: 'nearest'
            });
            break;
        }
    }
}
Lastly, I have two more listeners that are waiting for messages from the popup part of my extension.
//listen for message from popup.js "get_ingredients"
chrome.runtime.onMessage.addListener((request, sender, sendResponse) => {
    if(request.message === 'get_ingredients') {
        scrollToIngredients();
    }
});

//listen for message from popup.js "get_recipe"
chrome.runtime.onMessage.addListener((request, sender, sendResponse) => {
    if(request.message === 'get_recipe') {
        scrollToDirections();
    }
});
Page buttons
We are getting into the design of the extension in the following sections of this post. I just wanted to give you an idea of how my page buttons look when they are injected into the recipe's website.
Here is a gif of my page buttons in action.
Popup Page
When you left click an extension icon in the extensions area of chrome.

You can see you get a little popup window for the extension's controls. Here you can have anything you want your extension to do. I made mine super simple and had two buttons that can take you to either the ingredients or recipe section of the page.
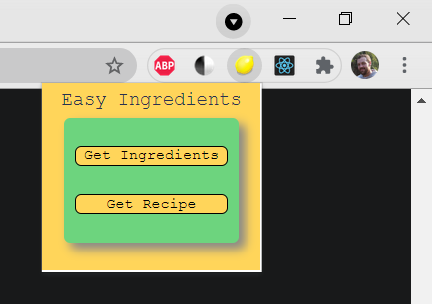
The two buttons on the popup send a message to the active tab in the browser(so the content script will receive them) and scrolls the window to either the ingredients or recipe section of the page.
const ingredBtn = document.getElementById('ingredients-btn');
const recipeBtn = document.getElementById('recipe-btn');

//ingredients button event listener
//sends message to content script
ingredBtn.addEventListener('click', () => {
    chrome.tabs.query({ active: true, currentWindow: true}, function(tabs) {
        chrome.tabs.sendMessage(tabs[0].id, { message: 'get_ingredients' });
    });
});

//recipe button event listener
//sends message to content script
recipeBtn.addEventListener('click', () => {
    chrome.tabs.query({ active: true, currentWindow: true}, function(tabs) {
        chrome.tabs.sendMessage(tabs[0].id, { message: 'get_recipe' });
    });
});
Options Page
Allow users to customise the behavior of an extension by providing an options page.
I kept my options page very simple. I allow the user to choose whether or not the in page buttons appear on recipe sites as well as the user can switch between light/dark mode themes for the options page.
Once again, in my options page I have cached the user_data object in memory for easy access. The options page can communicate with Chrome's APIs so I could make the call right from my options.js file when the user opens the options page. Once the user's data has loaded I can set either the light or dark theme and properly select the correct radio boxes for the current user settings.
//Get the saved user settings from chrome storage
//check the approriate checkboxes and go to toggle dark mode
const getUserData = () => {
    chrome.storage.sync.get(['btn_disp', 'light_mode'], (result) => {
        user_data = result;
        result.btn_disp ? showBtnRadio.checked = true : hideBtnRadio.checked = true;
        result.light_mode ? lightBtnRadio.checked = true: darkBtnRadio.checked = true;
        darkModeToggle(); //apply appropriate css file
    });
}

//user_data object
let user_data = {};

//get initial userData for checkboxes
getUserData();
The darkModeToggle() switches between two CSS files to apply the proper theme. There are many ways to do the light/dark theme toggle but in the end I chose to toggle between two CSS files and append it to the head of the document.
//check which option for light and dark mode
//apply css for either dark or light mode
const darkModeToggle = () => {
    const darkMode = '../css/dark_options_styles.css';
    const lightMode = '../css/light_options_styles.css';

    let pageStyles = '';

    user_data.light_mode ? pageStyles = lightMode : pageStyles = darkMode;

    const head  = document.getElementsByTagName('head')[0];
    let link  = document.createElement('link');
    link.rel  = 'stylesheet';
    link.type = 'text/css';
    link.href = pageStyles;
    link.media = 'all';
    head.appendChild(link);
}
The last thing on my options page are the event listeners for the user's clicks to the radio buttons. As soon as a new selection is made it gets saved to Chrome and if the light/dark mode was changed it makes a call to the darkModeToggle() to update the current theme.
const showBtnRadio = document.getElementById('show');
const hideBtnRadio = document.getElementById('hide');
const lightBtnRadio = document.getElementById('light');
const darkBtnRadio = document.getElementById('dark');

//EVENT LISTENERS TO UPDATE USER SETTING CHANGES
//saves changes as soon as user clicks the radio button
showBtnRadio.addEventListener('click', () => {
    chrome.storage.sync.set({ btn_disp: true });
});

hideBtnRadio.addEventListener('click', () => {
    chrome.storage.sync.set({ btn_disp: false });
});

lightBtnRadio.addEventListener('click', () => {
    chrome.storage.sync.set({ light_mode: true });
    getUserData(); //call to update css file
});

darkBtnRadio.addEventListener('click', () => {
    chrome.storage.sync.set({ light_mode: false });
    getUserData(); //call to update css file
});
Some things I would change...
Firstly, after writing this post and looking back at my code, I would pick a different way of caching my user's data. I would have to do some further investigation but maybe using the Cache API would have been more appropriate.
Next, I would invest a little more time into my HTML and CSS portion of this project. My initial intention was not to spend too much time with styling but a good looking interface is always nice.
Lastly, if I was to do this project again I would try to find a better technique to find the sections of the webpages. Rather than inject my script to each new website I visit I could have an array of recipe sites that my extension becomes active on. I am not sure, at this point, if I would have to declare this in the manifest or if I could programmatically do this within my background script.
Final Thoughts
Overall, I enjoyed going through this project and experimenting with Chrome's APIs and injecting my scripts into websites. I think there is a lot of potential for Chrome extensions. As I worked through this project new ideas came to me and I have a few more extensions coming along.
Lastly, I didn't talk about the deployment of a Chrome extension. I think this has got to be long enough and I will make a follow up post on deploying and publishing a Chrome extension.
I would love to hear about your experience with Chrome extensions or any feedback and comments you might have. :)
Have a look at my repo on GitHub:
